
javalin-sureness sample repository
Using Sureness to secure Javalin REST API by providing authentication(JWT,Basic,Digest) and authorization(RBAC)
What You Will Learn
- Creating a simple REST API using Javalin
- Learn how to integrate Sureness into a Javalin application
- Learn how to issue a JWT
- Test API authentication - use JWT Auth, Basic Auth, Digest Auth to test the security of the REST API
- Test API authorization - use different users to verify that they can access the REST API
The tutorial assumes that you know what JWT, Basic Auth, Digest Auth, RBAC are. If you do not, then you can check jwt, basic auth , digest auth, rbac for an introduction.
Setting Up Dependencies
First, you will need to create a maven project and add Javalin, Sureness dependencies coordinate
        <dependency>
            <groupId>io.javalin</groupId>
            <artifactId>javalin</artifactId>
            <version>{{site.javalinversion}}</version>
        </dependency>
        <dependency>
            <groupId>com.usthe.sureness</groupId>
            <artifactId>sureness-core</artifactId>
            <version>1.0.2</version>
        </dependency>
        <dependency>
            <groupId>org.slf4j</groupId>
            <artifactId>slf4j-simple</artifactId>
            <version>1.7.30</version>
        </dependency>
Setting Up Javalin and Create REST API
We need to create a simple Javalin app and provide some REST API for test.
        // init javalin
        Javalin app = Javalin.create().start(8088);
        // create simple rest api
        // simple rest api
        app.routes(() ->
            path("api", () -> {
                path("v3", () -> {
                    get("host", ctx -> ctx.result("get /api/v3/host success"));
                    put("book", ctx -> ctx.result("put /api/v3/book success"));
                });
                path("v2", () -> {
                    path("host", () -> {
                        get(ctx -> ctx.result("get /api/v2/host success"));
                        post(ctx -> ctx.result("post /api/v2/host success"));
                        put(ctx -> ctx.result("put /api/v2/host success"));
                        delete(ctx -> ctx.result("delete /api/v2/host success"));
                    });
                });
                path("v1", () -> {
                    path("source1", () -> {
                        get(ctx -> ctx.result("get /api/v1/source1 success"));
                        post(ctx -> ctx.result("post /api/v1/source1 success"));
                        put(ctx -> ctx.result("put /api/v1/source1 success"));
                        delete(ctx -> ctx.result("delete /api/v1/source1 success"));
                    });
                });
            }));
Setting Up Sureness
1. Use the Default Configuration to Configure Sureness
The default configuration -DefaultSurenessConfig uses the document datasource sureness.yml as the auth datasource.
It supports JWT, Basic Auth, Digest Auth authentication.
    public static void main(String[] args) {
        // init sureness default config
        new DefaultSurenessConfig();
    }
2. Config Document Datasource - sureness.yml
Sureness authentication requires us to provide our own account data, role permission data. These data may come from document, databases,, annotations, etc. When we use sureness default configuration above, the datasource is document - sureness.yml.
Create a file named sureness.yml in the resource directory. Configure account data, role permission data in the sureness.yml. eg:
## -- sureness.yml document dataSource-- ##

# load api resource which need be protected, config role who can access these resource.
# resources that are not configured are also authenticated and protected by default, but not authorized
# eg: /api/v2/host===post===[role2,role3] means /api/v2/host===post can be access by role2,role3
# eg: /api/v1/source2===get===[] means /api/v1/source2===get can not be access by any role
resourceRole:
  - /api/v1/source1===get===[role2]
  - /api/v1/source1===post===[role1]
  - /api/v1/source1===delete===[role3]
  - /api/v1/source1===put===[role1,role2]
  - /api/v1/source2===get===[]
  - /api/v2/host===post===[role2,role3]
  - /api/v2/host===get===[role2,role3]
  - /api/v2/host===delete===[role2,role3]
  - /api/v2/host===put===[role2,role3]
  - /api/v3/*===*===[role1,role2,role3]

# load api resource which do not need be protected, means them need be excluded.
# these api resource can be access by everyone
excludedResource:
  - /api/v3/host===get
  - /**/*.html===get
  - /**/*.js===get
  - /**/*.css===get
  - /**/*.ico===get

# account info
# there are three account: admin, root, tom
# eg: admin has [role1,role2] ROLE, unencrypted password is admin, encrypted password is 0192023A7BBD73250516F069DF18B500
# eg: root has role1, unencrypted password is 23456
# eg: tom has role3, unencrypted password is 32113
account:
  - appId: admin
    # if add salt, the password is encrypted password - the result: MD5(password+salt)
    # digest auth not support encrypted password
    # if no salt, the password is unencrypted password
    credential: 0192023A7BBD73250516F069DF18B500
    salt: 123
    role: [role1,role2]
  - appId: root
    credential: 23456
    role: [role1,role2]
  - appId: tom
    credential: 32113
    role: [role3]
3. Add an Interceptor Intercepting All Requests
The essence of sureness is to intercept all rest requests for authenticating and authorizing. The interceptor can be a filter or interceptor, it intercepts all request to check them. In Javalin, we use app.before().
        // intercept all rest requests for authenticating and authorizing
        app.before(ctx -> {
            SubjectSum subject = SurenessSecurityManager.getInstance().checkIn(ctx.req);
            // when auth error , the exception throw, you should use app.exception() catch it and define return
            if (subject != null) {
                SurenessContextHolder.bindSubject(subject);
            }
        });

        app.after(ctx ->  SurenessContextHolder.unbindSubject());
4. Last, Implement Auth Exception Handling Process
Sureness uses exception handling process:
- If auth success, method -
checkIn()will return aSubjectSumobject containing user information. - If auth failure, method -
checkIn()will throw different types of auth exceptions.
We need to continue the subsequent process based on these exceptions.(eg: return the request response)
Here we need to customize the exceptions thrown by checkIn, passed directly when auth success, catch exception when auth failure and do something:
        // when auth error , the exception throw, you should use app.exception() catch it and define return
        app.exception(UnknownAccountException.class, (e, ctx) -> {
            log.debug("this request user account not exist");
            ctx.status(401).result(e.getMessage());
        }).exception(IncorrectCredentialsException.class, (e, ctx) -> {
            log.debug("this account credential is incorrect");
            ctx.status(401).result(e.getMessage());
        }).exception(ExpiredCredentialsException.class, (e, ctx) -> {
            log.debug("this account credential expired");
            ctx.status(401).result(e.getMessage());
        }).exception(NeedDigestInfoException.class, (e, ctx) -> {
            log.debug("you should try once again with digest auth information");
            ctx.status(401).header("WWW-Authenticate", e.getAuthenticate());
        }).exception(UnauthorizedException.class, (e, ctx) -> {
            log.debug("this account can not access this resource");
            ctx.status(403).result(e.getMessage());
        }).exception(Exception.class, (e, ctx) -> {
            log.error("other exception happen: ", e);
            ctx.status(500).result(e.getMessage());
        });
Provide an Issue JWT Api
Now we provide a REST API to issue JWT. We can use this JWT to test JWT auth.
       // issue jwt rest api
        app.get("/auth/token", ctx -> {
            SubjectSum subjectSum = SurenessContextHolder.getBindSubject();
            if (subjectSum == null) {
                ctx.result("Please auth!");
            } else {
                String principal = (String) subjectSum.getPrincipal();
                List<String> roles = (List<String>) subjectSum.getRoles();
                // issue jwt
                String jwt = JsonWebTokenUtil.issueJwt(UUID.randomUUID().toString(), principal,
                        "token-server", 3600L, roles);
                ctx.result(jwt);
            }
        });
All done, we can test now!
Test
Through the above steps, a complete auth function project is completed. Someone maybe think that with only these few steps, where is its complete function and what can it support?
This built project is based on the RBAC permission model and supports Baisc authentication, Digest authentication and JWT authentication. It can fine-grained control the user's access to the restful api provided by the Javalin. That is to control which users can access which api.
Let's test it. (we use postman and chrome to test.)
Test Authentication
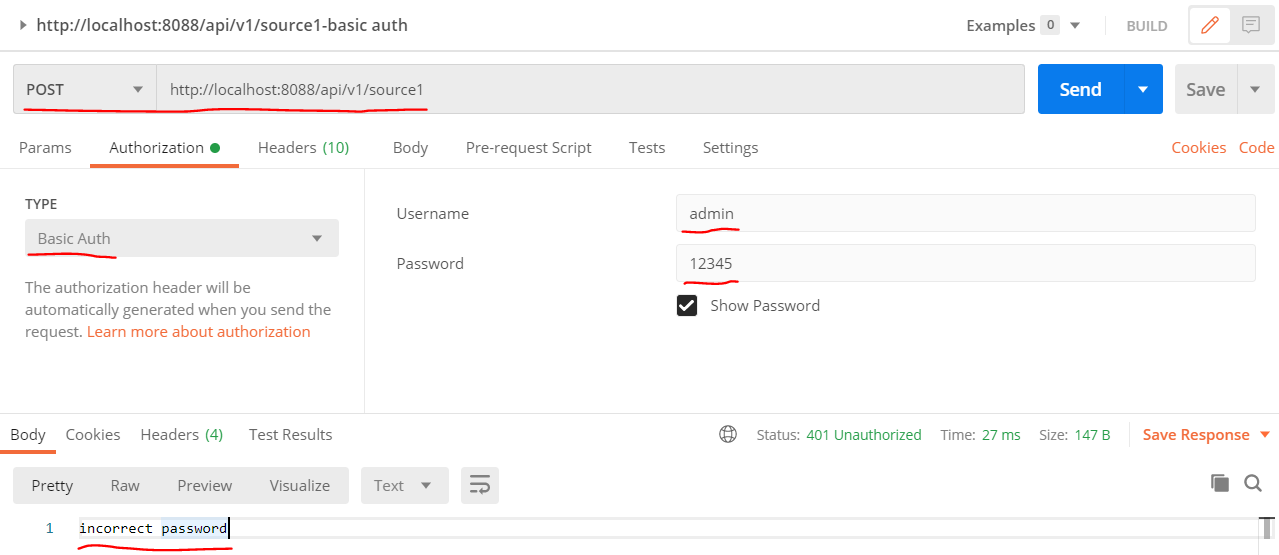
1. Basic Auth Test
Use postman Basic auth, as shown below:
- success - input username: admin, password: admin

- fail - input username: admin, password: 12345
2. Digest Auth Test
Note: If password has been encrypted, Digest auth not support.(So the account admin not support Digest auth).
Use chrome to Digest auth, as shown below:


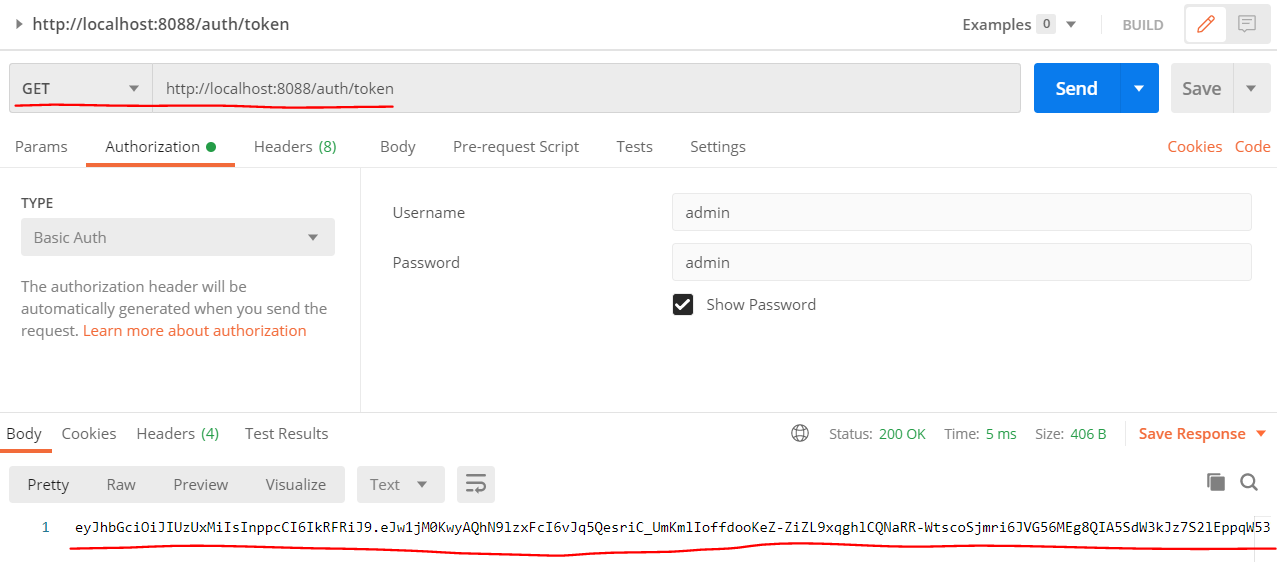
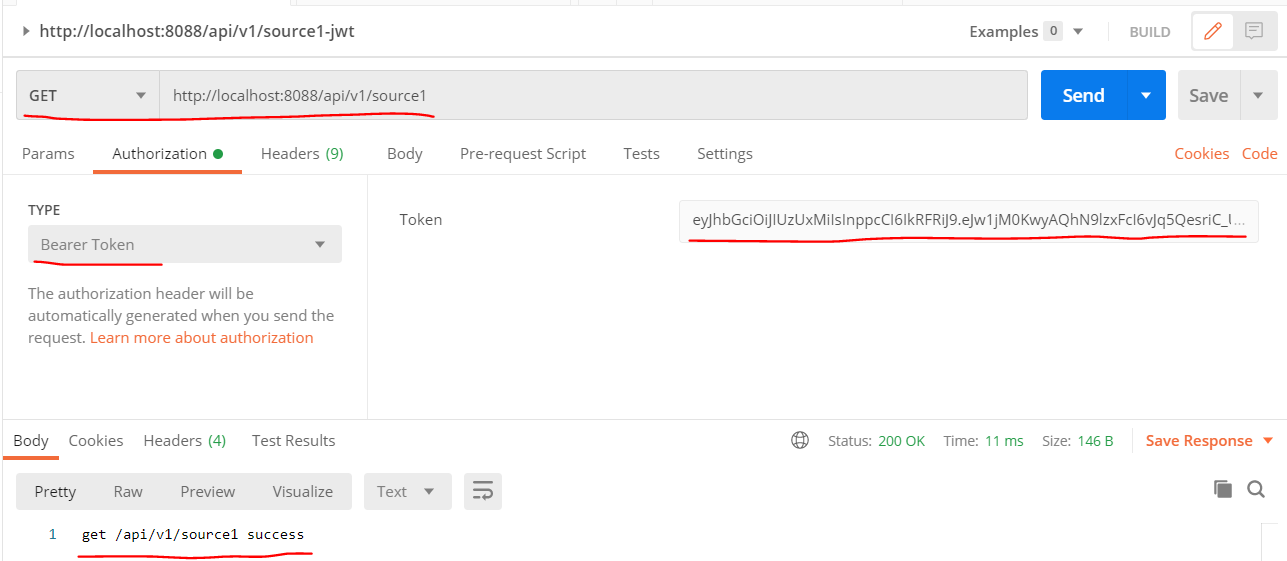
3. JWT Auth Test
First, we should access [GET /auth/token] api to get a JWT to use, as shown below:
Then, use the JWT as Bearer Token to access REST API, as shown below:
Test Authorization
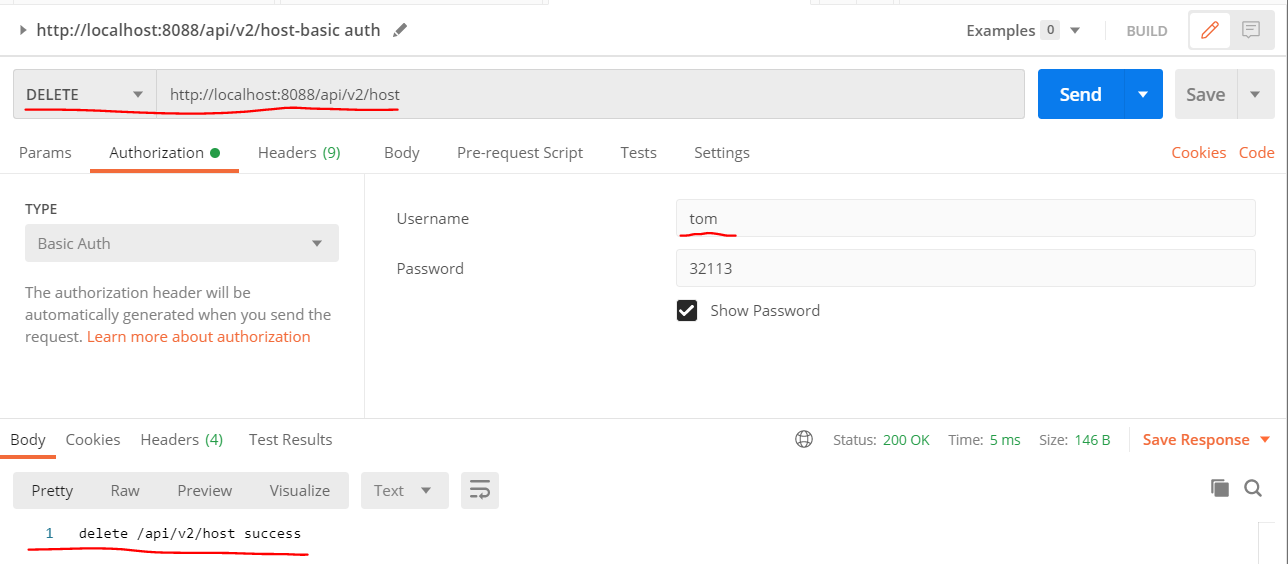
- success - user tom has role role3, the api [DELETE - /api/v2/host] support role3 access, so tom can access api [DELETE - /api/v2/host] success, as shown below:
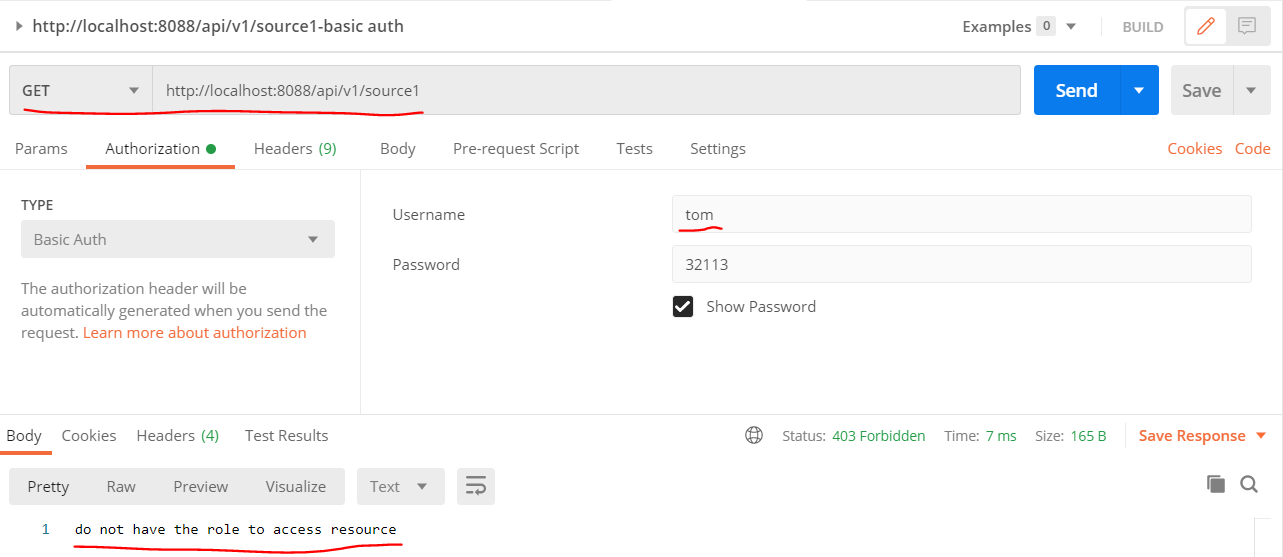
- fail - user tom only has role role3, the api [GET - /api/v1/source1] only support role2 access, not support role3, so tom can not access api [GET - /api/v1/source1], as shown below:
Conclusion
Javalin is a framework dedicated to simplicity and ease of use, and so is Sureness.
We hope you enjoy this tutorial. Of course, the tutorial only introduces a simple introduction. Our account data, role permission data can not only be written in sureness.yml, but also loaded and obtained from the database and annotations. We can also customize the authentication method, data source, etc.
Finally, thank you again for reading.